Interior of a 1949 BL
Traction Owner’s Club › Forums › Technical › Bodywork & interior › Interior of a 1949 BL
- This topic has 15 replies, 3 voices, and was last updated 7 years, 2 months ago by Larry Lewis.
-
AuthorPosts
-
3rd May 2019 at 5:48 pm #24815
Larry Lewis
ParticipantI am about to start the interior work on my BL. I bought everything from Renel auto. They included some extra fabric matching the door cards to do the vertical bit between the doors. Now, alongside the back seat and over the rear wheel wells, isn’t that supposed to be vinyl? I have seen cars where it is done in the striped material but it doesn’t look right. Most any Traction that I’ve seen has been redone so I am wondering what is proper. Also, the bit above the windscreen- Vinyl or headliner fabric? any help is appreciated!
- This topic was modified 7 years, 2 months ago by Larry Lewis.
3rd May 2019 at 6:18 pm #24818Paul Barnard
ParticipantHi Larry
Mine is a 1950 BL and the interior was totally original when I got it, just stained brown with Gauloise smoke! The section above the windscreen is in the striped material – I’ve just re-covered it. Alongside the seat and over the wheel arches is also done in the striped material in mine (I’m just about to start that work myself – it had a period cover over it as well – also striped but wider stripes which matched the seat covers. I can send you some pics if it would help.
I also used Renel – very obliging folks.
Paul
4th May 2019 at 2:09 am #24821ParticipantHi Paul- yes if you could post some photos that would be a big help- It’s 100% original? thanks-Larry
4th May 2019 at 11:34 am #24825Participant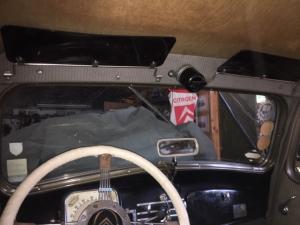
Hi Larry,
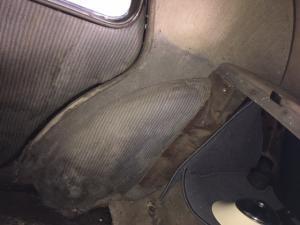
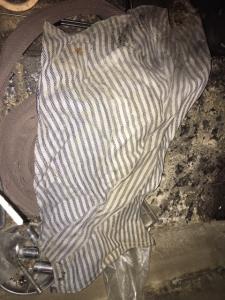
Sorry for the quality of the pictures but hopefully you can see what I mean. The line across the lining by the side of the seat is the result of having been protected by the rather nasty looking piece of material in the last picture which was actually part of a set of period covers which matched those fitted to the seats. Having recovered all my seats I’m now forced to do all the interior but I think I may get some professional help with the headlining which frightens me to death…I’m still struggling with having to nail everything in.
The car spent 25 years sitting in a basement garage in the south of France having been owned by father and then son until it was laid up when he bacame 65. Hence the original interior.
Out of interest, did you purchase Renel’s ready covered door panels? When I came to fit mine I discovered that the clip holes in the new panels did not line up with the holes in the door – bummer – took a lot of work to sort out.
Hope this helps
Paul
5th May 2019 at 1:41 am #24828ParticipantHi Paul thanks for the pictures that’s a big help- I did buy the ready made door panels- glad you told me about the clip holes. But in my car, the lower parts of the doors were replaced so there are no holes there, so I will have to drill them. I also bought the sun visors which my car never had. On the rear side panel, the striped bit is sewn to the upper part and then glued to a backing, right? I will have to make a pattern out of cardboard but the side panel is all one piece? The headliner and seats I will leave to a pro, everything else I can do myself. All of the tacking strips around the doors are in good condition and the windlace I will staple to them. I still have a box of monel (non rusting) staples that I used to do the windlace on my 54 11B that I redid in 1986. Glad I didn’t throw them out.
5th May 2019 at 6:31 pm #24832Participant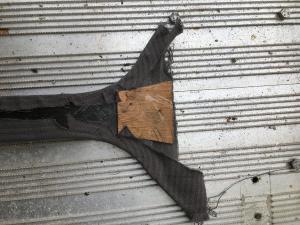 Hi Larry
The original sun visor in my car on the driver’s side was a nasty cardboard thing which had suffered from the damp so I’ve fitted the ones you can see. Yes, the side panels have a card backing the whole way up to the headlining and there is an angled stitched join in the material right on the corner on the narrow section just where it starts to widen. You can just see it if you enlarge the pic There is no join higher up, that’s just discolouration from where the lower part was covered up. It’s all striped material. The separate part over the inner wing has some kind of thin felt underneath it.
I also used staples for the windlace where I could. On the door panels I found that the clips provided by Renel would not hold in the existing holes. The pic is the back of the section between the doors – I think this is the top.
Paul
5th May 2019 at 8:00 pm #24833ParticipantThanks Paul- I am right now gluing in the insulation padding on the bulkhead, sides of the sills and the roof. I’ll need another roll of it to do the floors and under the back seat. The side panel next to the back seat, that’s all one piece, the backing I mean? Held on with clips, not screws, right? I tossed out all the interior except the seats when I first got the car as it was redone in the 1970s and showed. Avocado green shag carpeting! I plan to make that side piece out of masonite (don’t know what you call it over there) but I will leave the fabric covering it to a shop who has done some excellent work for me on my Light 15.
6th May 2019 at 4:34 pm #24843ParticipantHi Larry
Not many screws, just about everything is ‘nailed’ in with gimp nails but I can’t see any nails on that single side panel (yes, all one piece) – haven’t tried taking mine out yet, mind you. I found with some other bits that they used panel pins, so you may find the side panels are nailed in but you can’t see the heads. Don’t know about your car, but in mine the whole of the floor, front and back,was covered in a layer of tar and then the felt must have been laid on top of that while it was still wet, in the front I scraped it all off and replaced it with Dyna-mat rolled on with an old wallpaper roller and then a layer of modern insulation on top. Have you discovered the two gaps they left right in the corners where the rear axle mounts come through into the car in the back with just a little piece of rubber over? I think I may use some DumDum putty here as it stays flexible and I can’t see the sense in leaving a gap for water to come in.
Paul
6th May 2019 at 7:26 pm #24844ParticipantOn my car there was nothing on the floor except about 100 small rust holes in the front floor. My bodyman replaced that with a new piece from Jose Franssen and he did an amazing job of it.The rear floor was solid. I did paint the entire floor with a product used to paint the bed of a pickup truck. The insulation product I am using is called EZ Cool and is about 3/8” thick and does not retain water. I’m almost done gluing it in but won’t glue it to the floors because as I’m sure you know, these cars car leak water. I will glue the underlay over the two corner holes and will probably put some putty there also. It’s coming along but I am going to have the doors, wings and bonnet painted (the roof and boot lid are done) before I do anything further as far as fabrics are concerned. I moved the drivers seat rearward by taking the front mount angled bits and cut them off with an cutting wheel and bolted them down in the hole that was about 1 inch from the front edge of the seat mount- I was uncomfortable with the seat so close but this is a change that can be put back to original if a subsequent owner desired.
7th May 2019 at 3:06 pm #24851ParticipantWhen I bought my car it was in the UK and the man who brought it across from France only kept it a short while before I bought it from him. Unfortunatelly for me he had decided to respray it! Unfortunately it left the car with large areas of ‘orange peel’ and the work involved to polish it out has been exhausting to say the least. That sounds like a good idea with the seats – I am 6′ 2″ and find that I am rather close to the pedals.
All the best
Paul
7th May 2019 at 3:27 pm #24852ParticipantI’m 5 foot eight inches and found it uncomfortable. Funny how the Light 15 I used to own had ample room without changing the seat mounts. Today i will be buying plywood for the rear window tacking strip and masonite for the interior sides. Glad I saved one of the bits that goes between the doors to use for a pattern. It seems to be a heavy cardboard, not sure if that’s original, not that it matters anyway.
8th May 2019 at 9:21 am #24865ParticipantYou can see in that pic I sent that the centre piece has a small piece of plywood at one end as some kind of strengthener. You could use your masonite again On mine its the same kind of thick card as used for the side panels. By the way what was the link for your photo collection? – I seem to have lost it
Paul
8th May 2019 at 2:43 pm #24873David Faulkner
ParticipantPaul there is a back article in Floating Power with a diagram on how to extend the seat back. Sorry can’t link to it atm as out of the country but hopefully someone will see thas and point you to it.
9th May 2019 at 10:32 pm #24881ParticipantPaul-If you go to General Discussions and look at the thread that I started 4 (!) years ago that reads”Is it still a project when I haven’t done anything yet” on page 4 of that is the link to the great big photo fun fair. I will be adding some more as soon as I take more pictures but right now it’s pouring rain so the hell with it for now. In two weeks the car goes back to the body shop to get the doors, wings and bonnet painted and I will take photos of the process and upload them. After that, the interior! So far this year I’ve installed a starter solenoid as I could not pass the bowden cable into the starter switch for some reason. I could before but even then I could barely pull the knob to start the car. So now it has a Lucas pushbutton on the dashboard. Starts right up, hot or cold but damn it’s noisy with no carpets or door panels. I will probably lower the suspension as it looks rather high and it rides like a Jeep.
20th May 2019 at 1:37 pm #24931ParticipantIf anyone is interested in extending the seat back I found the link today, it’s a diagram in Dutch but you can see what to do from the diagram: https://www.tanmidden.nl/index.php?option=com_content&view=article&id=20&Itemid=40.
-
AuthorPosts
- You must be logged in to reply to this topic.