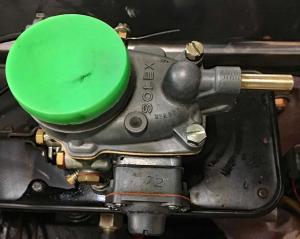
Solex 32 PBIC Carb rebuild
Traction Owner’s Club › Forums › Technical › Engine › Solex 32 PBIC Carb rebuild
- This topic has 2 replies, 2 voices, and was last updated 6 years, 7 months ago by David Faulkner.
-
AuthorPosts
-
18th December 2018 at 3:12 pm #24200
David Faulkner
ParticipantEarly this year I decided to re build my original Solex 32 PBIC carb and well, broke it….. I snapped off the emulsion tube top trying to remove the correction jet (apparently they are sometimes held with ‘locktite’ which I learned later and should have left it alone 🙁 )

Having no option, I bought a Copy carb from Club Stores and have ran the car with that all summer, but it never felt ‘100%’ right and seemed to run weak when Traction’s on the whole tend to run rich I was reliably informed. It also was a problem starting on a couple of occasions as there was a lack of fuel at the carb strainer which we thought was an airlock, but why?
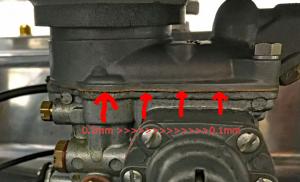
Now I fitted a new petrol pump a couple of weeks ago and found that the carb leaked petrol when pumped by hand and if petrol can come out, then air can get in so decided to investigate and found the carb top was uneven. Using a flat surface I found that there was a gap of 0.20mm at the accelerator pump jet down to 0.10mm at the float end. Now the gasket is only 0.20mm thick and fairly stiff so was not going to fully take up that gap when the top is fitted and tightened, no matter how hard you try.
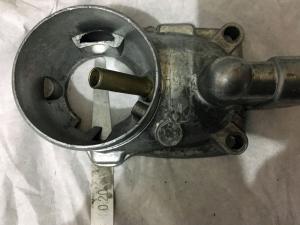
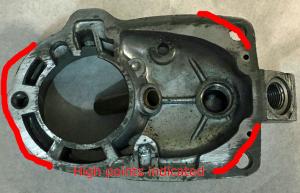
You can see the high spots and not so good finish on the face of the top section so I decided to use the original Solex top and lapped that smooth as it was a better quality casting using some old engineering skills.
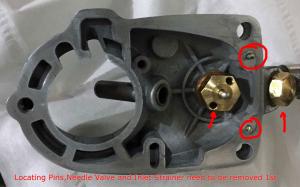
To do it, I removed the needle valve, inlet strainer then the 2 locating pins (grab the pins with a pair of pliers and pull and twist as they are an interference fit)
Once clear, I used a marble kitchen chopping board as a level base (a thick glass or smooth plastic one will also do as long as they are flat) and a sheet of 600 grit wet n dry. With minimal pressure slowly I lapped the surface clean and flat (you can do the same to the choke disc if it’s scored but as it is metal to metal without a gasket use 2000 grit paper and a light oil as a lubricant). Once cleaned and flattened (around 10 minutes only was needed) the old top was fitted to the copy carb with a new gasket being careful NOT to over-tighten the 3 bolts potentially distorting the top.
Now the car starts better and the choke can be fully pushed in once running and it will idle without choke when cold (it didn’t before) although still needing a bit of choke for a short time when driving.
On a positive note on the copy carb: The emulsion tube holder fitted to that is brass, not white metal aka an original Solex so is an improvement and should allow the correction jet to be changed if needs be in the future.
Don’t be put off buying one of the Solex copies, just be aware that they may need a bit of ‘fettling’ 🙂
18th December 2018 at 10:48 pm #24206Jack Peppiatt
ParticipantHi David,
Good bit of detective work there, I have used the same technique on SU carb flanges where they become banana shaped.
I am interested in your new fuel pump, TOC spares do not have them and I would like to revert to a mechanical type from the electric ticker now fitted. The constant tick and ammeter needle flicker is driving me potty. Where di you find it please?
Regards Jack
19th December 2018 at 8:45 am #24208ParticipantGot mine from Renel Jack for 50 euro, but Fransen et al all sell them. You just need to be aware that postage costs vary, which is why I used Renel plus Fransen have been taken over by CTA so there pricing may change.
-
AuthorPosts
- You must be logged in to reply to this topic.