Sunshine roof seal
Traction Owner’s Club › Forums › Technical › Bodywork & interior › Sunshine roof seal
- This topic has 27 replies, 8 voices, and was last updated 7 years, 3 months ago by Patrick Russell-Jones.
-
AuthorPosts
-
8th December 2018 at 9:03 pm #24159
David Selfridge
ParticipantHi Guys, a bit of good reading, if only the forum was this entertaining all the time. A good bit of banter and valuable information included, really, really enjoyed, Still laughing.
KEEP IT UP.
Davy
8th December 2018 at 9:04 pm #24160Richard Larter
ParticipantThis topic has been very interesting as I spend the summer without the sunroof as I did not want to force it open. Like Jack’s it was stuck to a seal at the back but would not yield to a firm hand but eventually after some investigation I used a flexible knife to break the seal. Now I know how to remove the sunroof I can service it properly.
Cheers Richard
8th December 2018 at 10:54 pm #24163Jack Peppiatt
ParticipantHi Martin,
me again! I could not resist the temptation, so prized the cover strips away from the inner edge of the roof opening and tentatively tried the screws. To my delight they unscrewed with little effort. I got no further however because despite some percussive persuasion, the outer panel would not budge and there is very little to hit, lever or cajole.
So first off may I have your pictures please to see if I am taking the right things out and secondly, how hard might it be to get the lid off?
Thanks in anticipation, compulsive this dismantling isn’t it!
Jack
9th December 2018 at 10:51 am #24165Bernie
ParticipantCher Grand-Pere Martin, et d’autres adorateurs du soleil …
Martin – I find the easiest way to share big pics on the forum is to attach a Dropbox link.
Create the Dropbox link as “normal” then insert it using the link icon (picture of a chain) which is penultimate icon on the right of the bar above the reply box.
If after all that, the sunshine roof still leaks it serves you right for buying a Slough car – and here is a good reason for not using it in the sun ….
https://www.dropbox.com/s/jkd4pl3t61xiada/Beware%20of%20the%20Sun.jpg?dl=0
B……….
9th December 2018 at 2:21 pm #24166ParticipantNick Olsen has sent me some photos of his sun roof. The first shows a side runner, which seems to have a cover of a rubber sort of material stuck on it, whereas mine just has the metal strip, worn shiny in places and in the past lubricated with something, now brown and slightly sticky (steady there!) I suspect the added strip is not original?
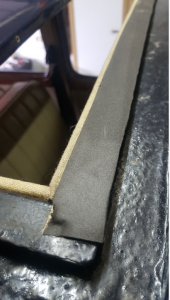
The second shows the screw fixing and a triangular plate under the sliding roof. Mine has the screw but not the plate, or is this hidden behind the head lining? I was expecting, once the screw was loosened, that the tin lid would be removable, leaving the lining in place or have I completely misunderstood? Perhaps the triangular plate clips over the side runner and once the screw is removed the tin roof and lining will lift off?
 9th December 2018 at 6:10 pm #24167
David Faulkner
ParticipantI suspect the added strip is not original?
Looks suspiciously like modern rubber trim to me…
I have used something similar, but heavier grade, on the door windows of my Legere
9th December 2018 at 6:24 pm #24168Martin Nicholson
ParticipantDavid
You are correct! One correction to Jack’s posting re my pics; the strip is on the front part of the roof frame. I put it there to stop vibration when the roof panel is closed. It works to a degree!
I will post more pics and hopefully some helpful notes, probably tomorrow.
M
10th December 2018 at 11:44 am #24169ParticipantHi All,
My thanks to Jack for posting a couple of my pics.
An update from me after having looked at the roof again.
After a further check, I’ve removed the inner trim and the screw (on one side).
On further study….. and of course it’s all coming back to me…!!
The triangular”plate” held by the screw is in fact a combined clamp and runner, if that makes sense?
To remove it, (after having removed the screw), you will need use a large screwdriver.
Hold it vertically against the inner edge of the plate and hit it gently with your fist, but mind the roof lining!!
See new pic. (The pic is drivers side on a RHD car).
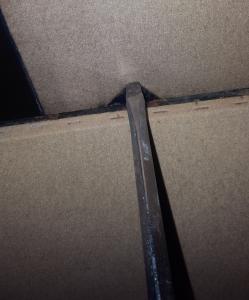
(Jack – It looks as though your “plate” is hidden under the lining. It must be there otherwise the roof wouldn’t slide).
This operation pushes the “plate” away from the rail on the side member of the frame, enabling the roof panel to be lifted up at the front and slid out as I mentioned in an earlier posting. See new pic.
If you study the pic carefully, you’ll see the “plate” has moved to the left, so it is clear of the rail. The felt which fits inside has not moved, so if yours does the same thing, you’ll need to refit the
felt before re-fitting the “plate”.When you’ve got the roof panel out and done your cleaning it’s worth greasing the runners on the frame; on top and underneath; the felt; and also the mechanism which lifts the back of the roof panel when you operate the opening/closing handle.
Also a blob of copper-slip on each grub screw.
The rubber strip shown on one of the earlier photos, is actually on the front of the frame. I put it there to help stop vibration when the roof is closed. It works to a degree!!
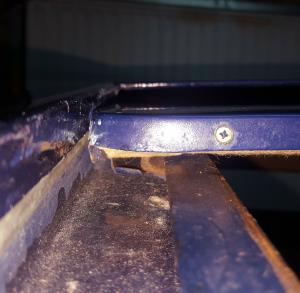
Finally, a slight clarification to an earlier posting…. Only the front and 2 side members of the sliding roof frame, are actually drainage channels. The rear member effectively just holds the assembly together. As far as I can recall, the rear edge of the roof panel itself, is formed into a channel section and acts as a drainage channel, which in turn discharges into the two side channels of the frame.
It sounds like some of you have a rubber/pvc strip stuck on the roof panel at the rear. I’m not sure of the purpose, but it may be to slow down or divert the flow of water away from the back of the panel; towards the sides. It sounds like it was not original. It may well work, but is clearly a pain when it fails.
Martin
PS The flash on the last photo makes my roof channel look very rusty! It really is just the flash!!
10th December 2018 at 6:23 pm #24171Patrick Russell-Jones
ParticipantJack
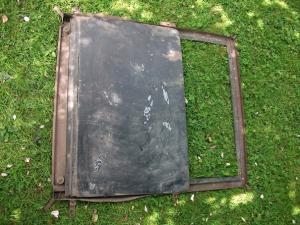
If it helps here are a couple of pictures of the sunroof out of the box!
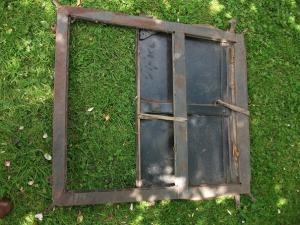
Patrick
10th December 2018 at 6:41 pm #24172ParticipantPatrick
Very useful. Brings back Happy ? Memories!!
Martin
10th December 2018 at 10:48 pm #24173ParticipantHello Patrick,
Interesting, I am interpreting your pictures as
Left hand: the back of the sliding roof structure is on the left of the picture, the sliding roof portion having been slid open?
Right hand: I assume the roof has been turned over and the back of the roof is now on the right?
I had assumed that there must be some sort of sideways bar from the back of the roof that lift the sliding portion, when the handle is turned to lift and lock the roof in place? I am not sure I can see it on these pictures. Perhaps it is underneath the slightly raised piece under the roof, and the square peg seen in the mifddle of the roof is part of the turning locking mechanism?
Anyway thanks for the pictures, which reveal much.
Regards Jack
10th December 2018 at 10:48 pm #24174ParticipantHello Patrick,
Interesting, I am interpreting your pictures as
Left hand: the back of the sliding roof structure is on the left of the picture, the sliding roof portion having been slid open?
Right hand: I assume the roof has been turned over and the back of the roof is now on the right?
I had assumed that there must be some sort of sideways bar from the back of the roof that lift the sliding portion, when the handle is turned to lift and lock the roof in place? I am not sure I can see it on these pictures. Perhaps it is underneath the slightly raised piece under the roof, and the square peg seen in the middle of the roof is part of the turning locking mechanism?
Anyway thanks for the pictures, which reveal much.
Regards Jack
11th December 2018 at 3:08 pm #24175ParticipantJack
Your interpretation is correct. In the right hand picture you can make out two rods (right hand end in from the frame) that are operated by the opening handle (at the other end of the roof) through a connecting mechamism along the raised tunnel under the roof . These allow the roof to drop down and slide backwards and vice versa to close.
Patrick
-
AuthorPosts
- You must be logged in to reply to this topic.