Window Channels
Traction Owner’s Club › Forums › Technical › Bodywork & interior › Window Channels
- This topic has 5 replies, 3 voices, and was last updated 6 years, 4 months ago by Bernie.
-
AuthorPosts
-
13th December 2019 at 12:03 am #25856
Christopher Smith
Can someone point me to any articles/photos on how to secure the window channel with ths special metal clips ( 1951 L15 ) Thanks Chris
14th December 2019 at 9:53 am #25857Bernie
ParticipantChris,
Sorry, no pictures but ……..
The clips need to align with relevant slots in the door frame. I suggest initially fitting the channel without the clips then placing chalk marks in line with the slots to assure correct location of the clips.
You can then remove the channel and fit the clips. With the long “tail” of the clip pointing to the outside of the channel when it is fitted to the vehicle, push the two tangs through the bottom of the “U” section of the channel from the outside and fold them over inside to secure them. You may need to punch suitable slots through the trim first with a flat-blade screwdriver or similar because the channel can be quite easily damaged.
When fitting the channel, the tails of the clips should all fit into a slot and the two loose ends should each be secured in the steel side guides in the door by a steel tag which must be bent to fit into and retain the channel. If these tags are damaged or missing (not uncommon) – or if the channel has been cut too short to give a tight fit – I recommend using an adhesive to ensure the ends are located and secured. This should minimises the risk of the channel being dragged down by the glass.
B.………..
13th March 2020 at 1:37 pm #26304Non Member
ParticipantHi – this may be me – but – I still can’t work out how to hold the door glass channel rubber (216-145) in place using the “hook for the glass channel” (216-146). There do not seem to be any slots in my door frames to insert the hooks (as Bernie describes)

Or is it easiest just to glue the channel to the frame?
Many thanks
Steve
14th March 2020 at 3:48 pm #26306ParticipantSteve –
IT IS YOU …. Or perhaps lack of clarity on my part.
You are presenting the clip the wrong way round. i.e. the “long” end (currently between your thumb and finger) is the end that goes into the oval shaped hole in the door.
BUT – fist of all you have to attach the other end of the clips to the channel – as described in my second paragraph, above –
<p style=”text-align: center;”>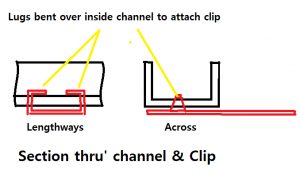 </p>
</p>
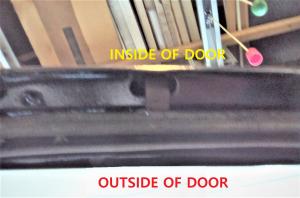
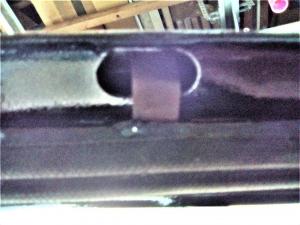
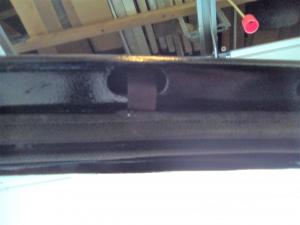
– and then offer the lot to the door as an assembly.I removed my interior window trim to take the following pictures of the top edge of the door frame, looking up from the aperture where the glass descends into the door.
If you download and zoom in, you will see the “tail” of the clip needs to be “fettled” to pass into the slots and hold the channel at the correct angle.
.
 Good luck – again.
B.……….
15th March 2020 at 10:25 am #26314ParticipantExcellent – thanks so much Bernie for all the trouble you have taken to explain this – I had been looking for a narrow slit to fit the “tail” of the clip into and not recognised that the oval cutouts (all around the window) are the correct venue. Everything has now gone together nicely.
16th March 2020 at 10:06 am #26317ParticipantInvoice for the specially commissioned illustrations is in the post!
B………..
-
AuthorPosts
- You must be logged in to reply to this topic.